
Before & After: Bye-Bye, Builder-Grade!
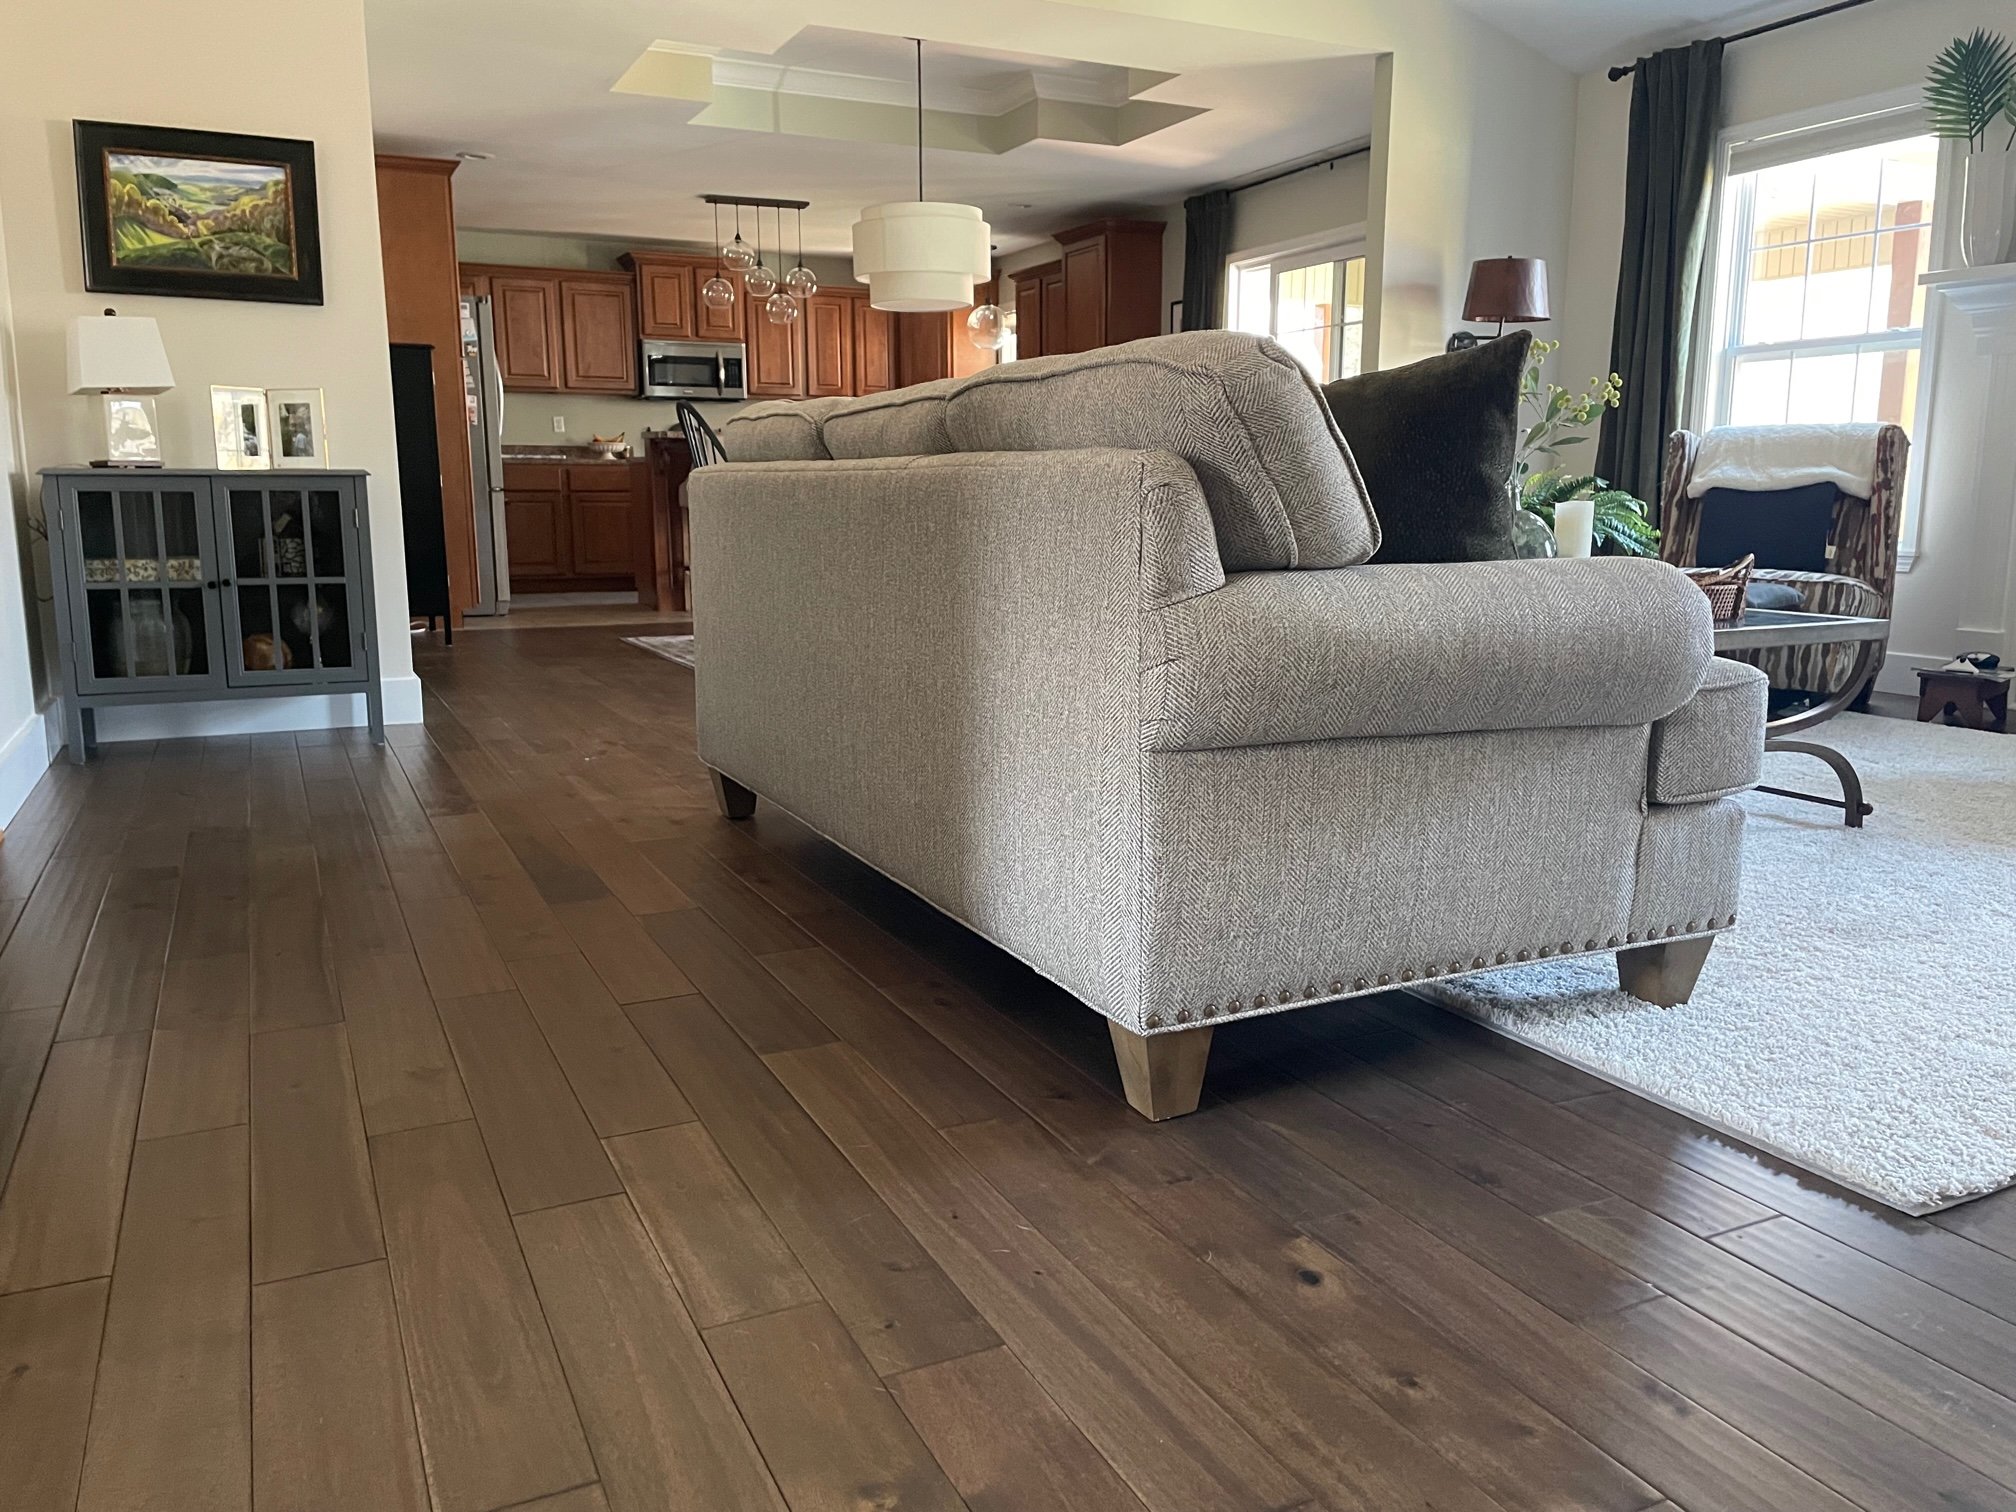
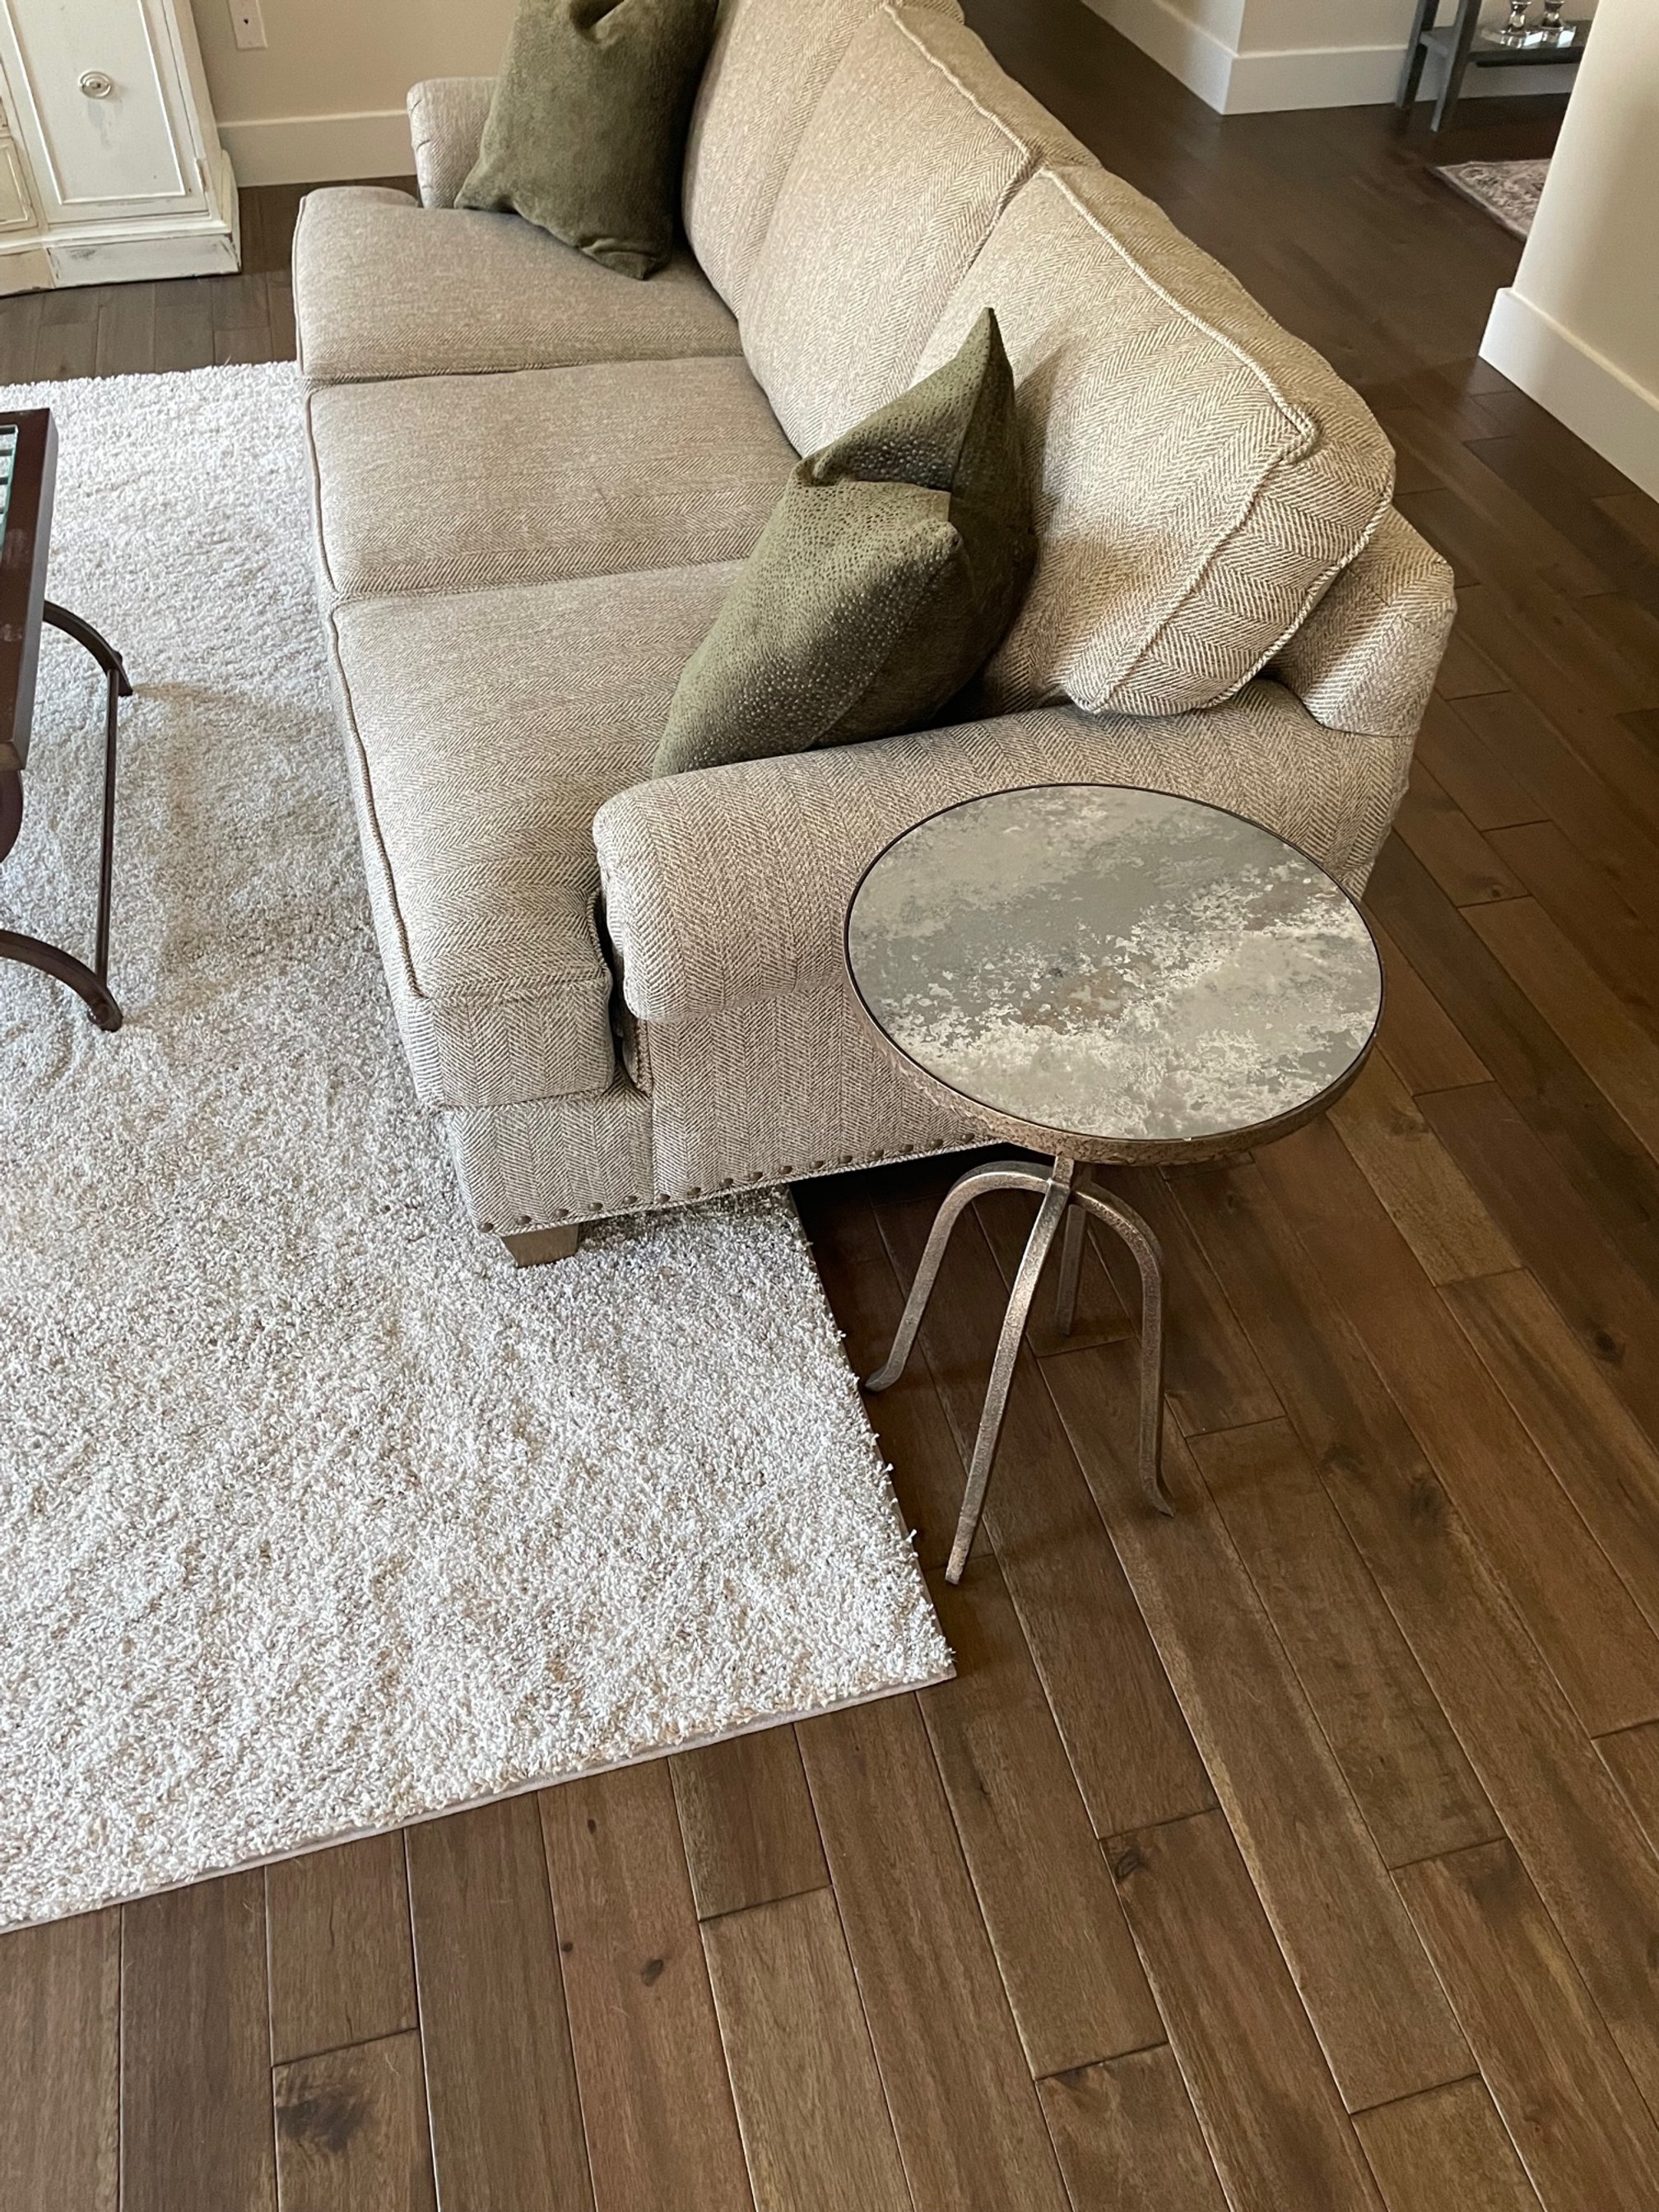
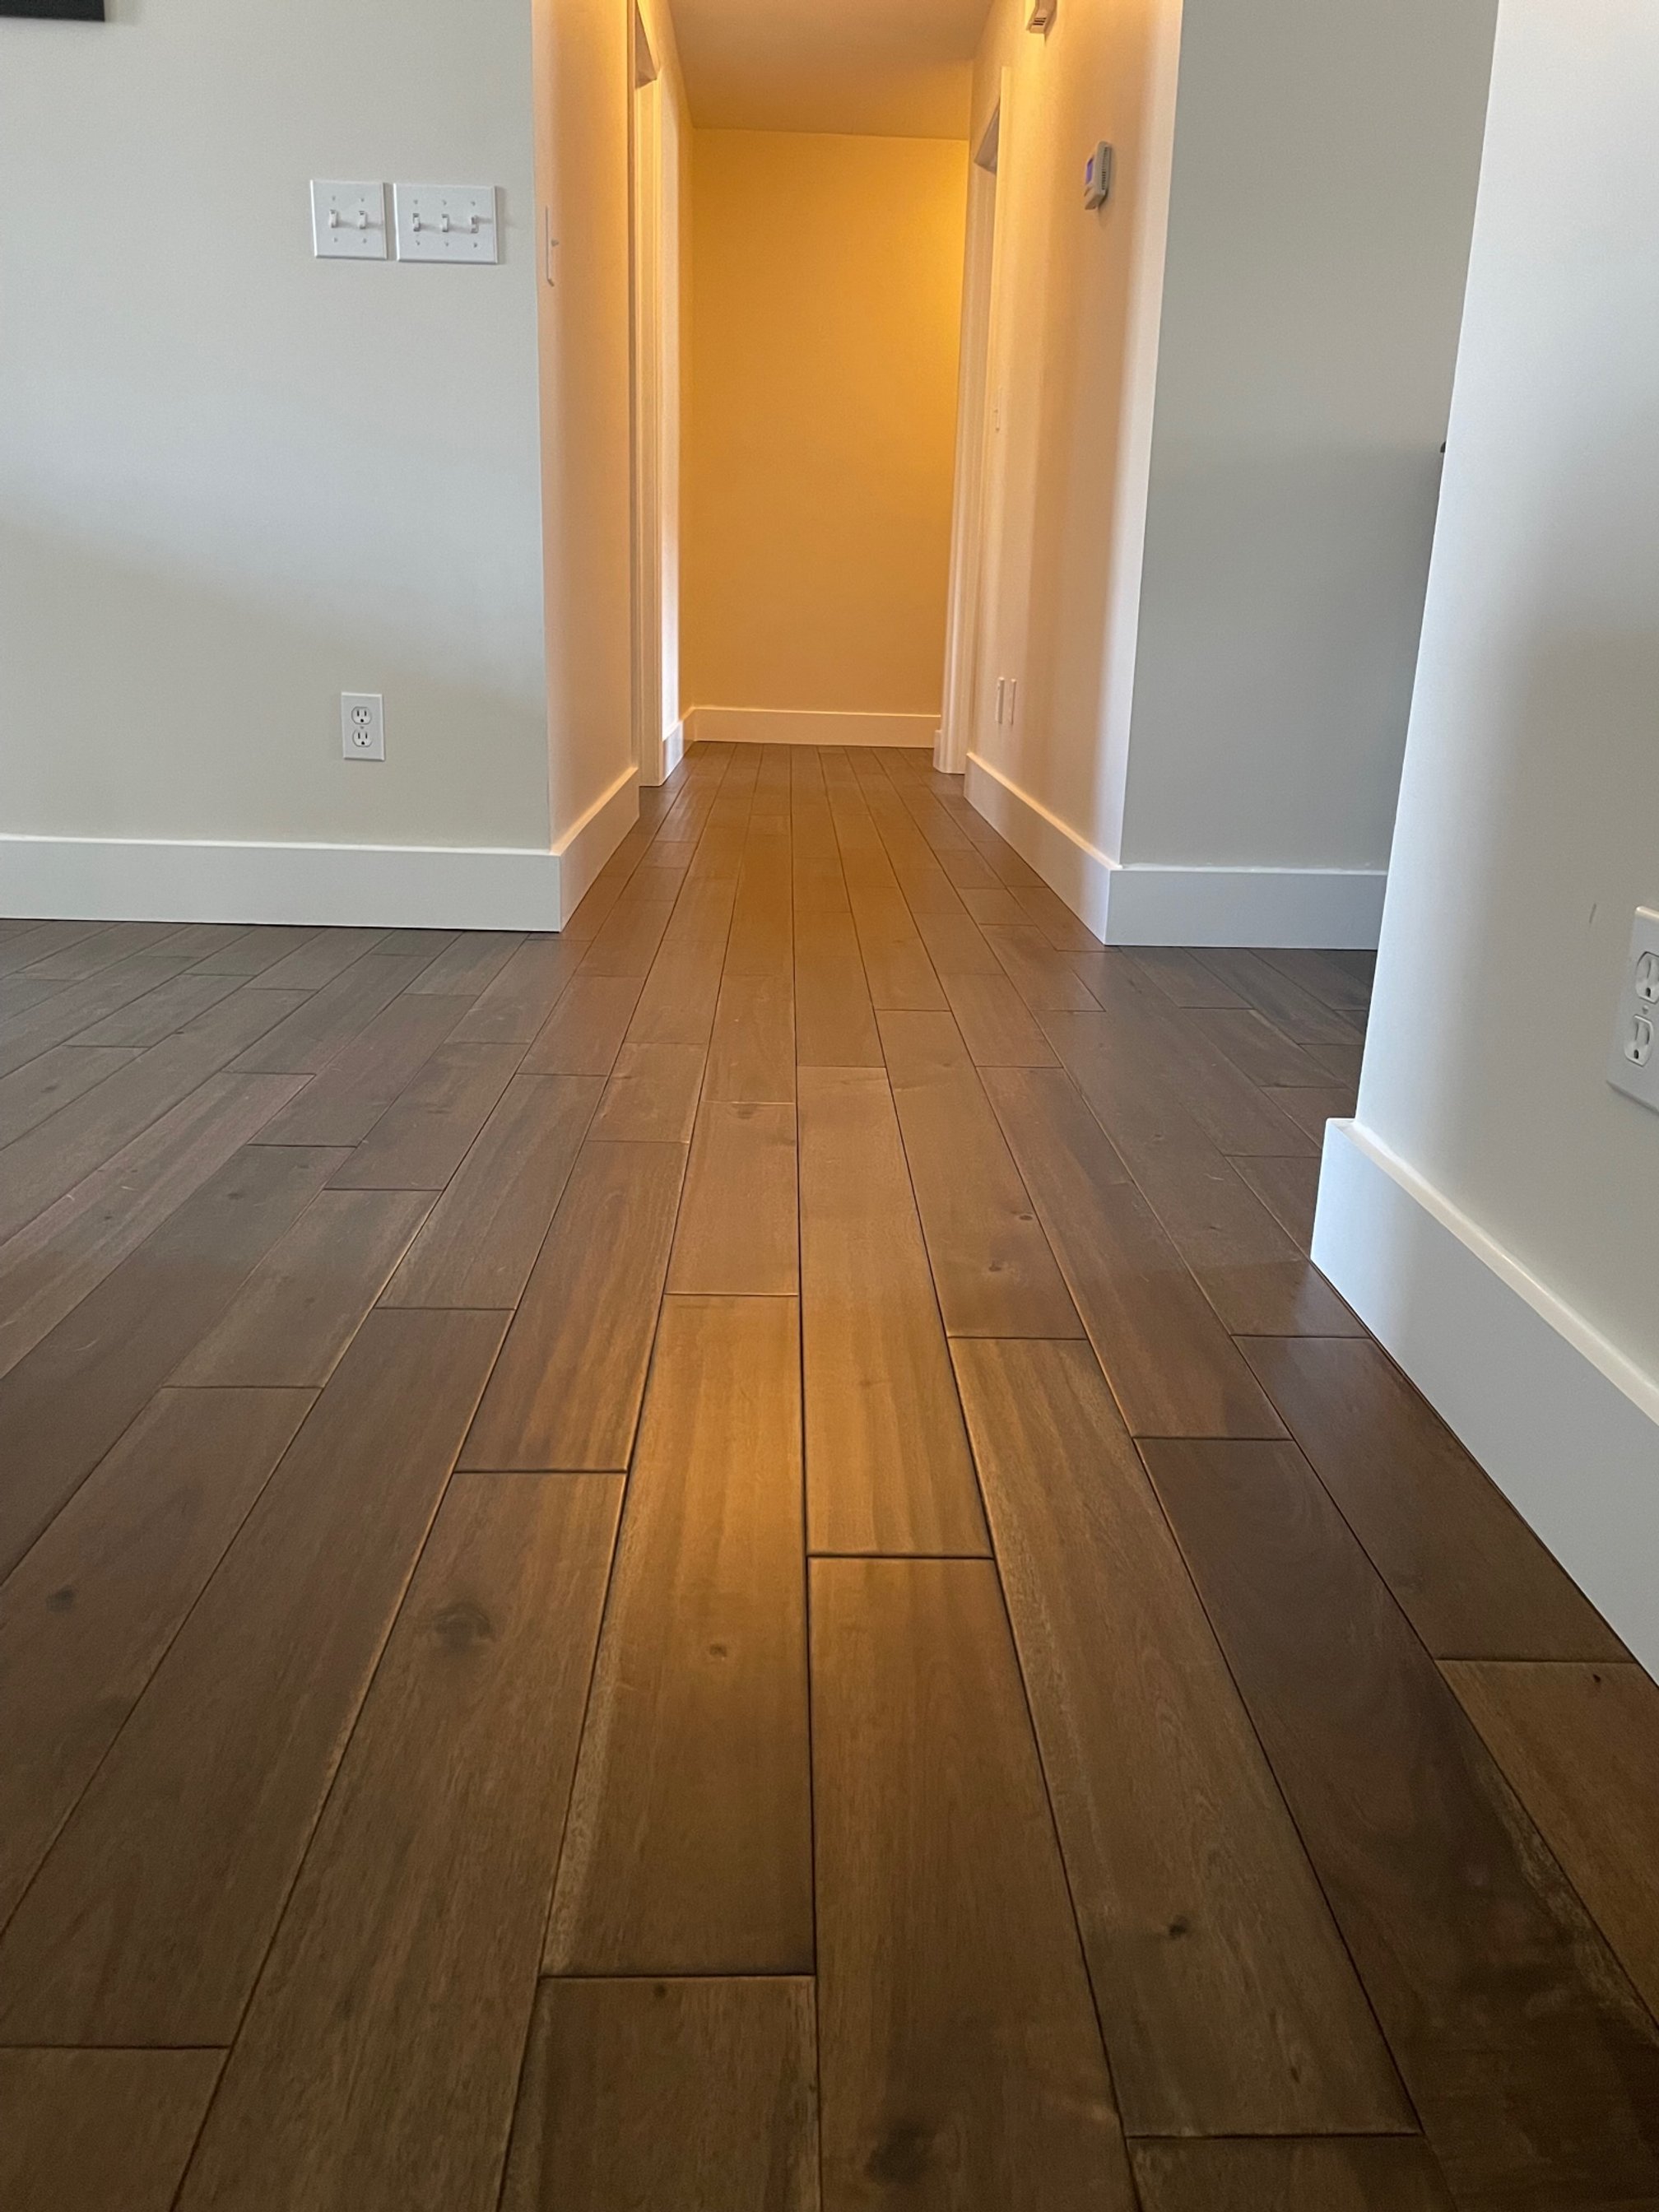
Our new hardwood from Casabella’s American Heritage collection in the Arlington finish picks up on the dark glazing in the grooves (and hardware that is still be installed) of the kitchen cabinets. And the new Craftmaster sofa looks great with it too.

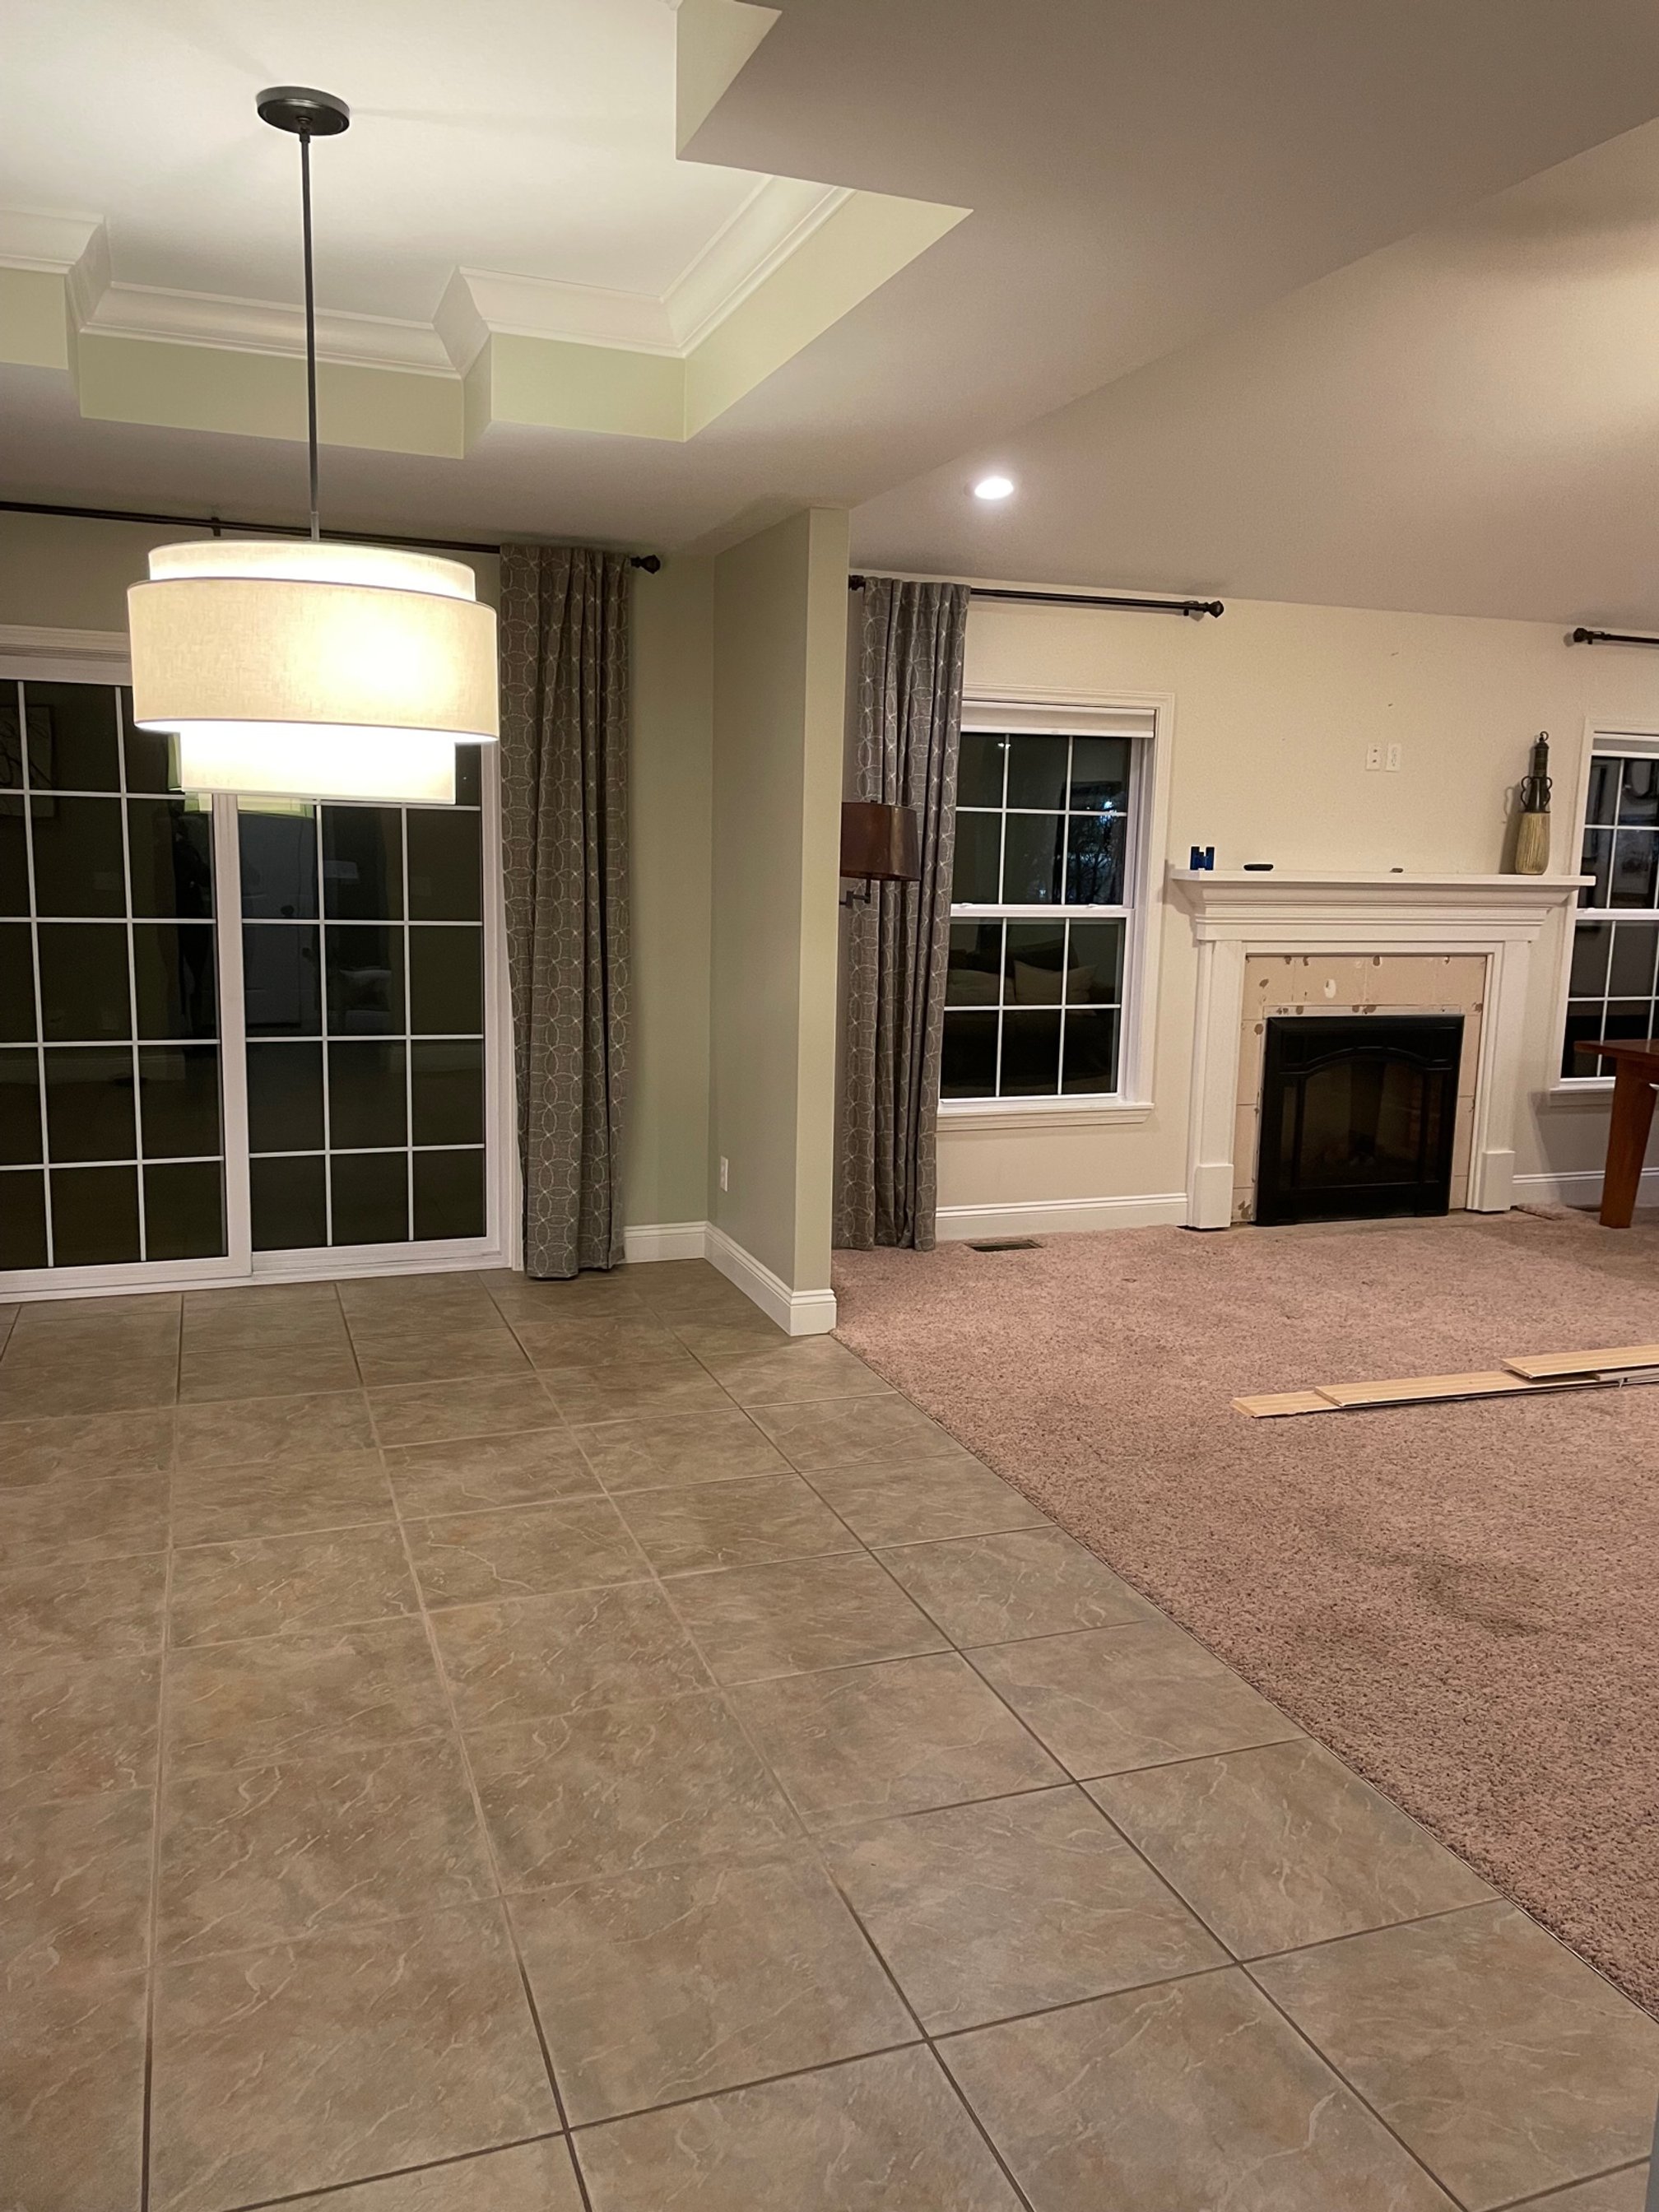
Before: Old carpeting, old tile and old sofa.
The builder-grade carpeting in our eight-year-old house had to go. I had known it for a while, but I was dragging my feet about making a change. The problem was that our open-concept house had carpeting in the family room and hallway, but tile in the entry ways, dining room, kitchen and laundry room. None of it was my doing. The flooring was already installed when we decided to purchase this house in 2013, but now was my chance to right this design wrong. My vision was to put hardwood throughout the entire first floor, however that would require ripping up all of that tile and, if I extended the hardwood into the kitchen like I really wanted, to create the great flow that comes with one type of flooring throughout a space, that meant ripping out the lower cabinets and the island, not to mention moving the fridge and stove during installation. Ugh!! My husband was not on board with a project of that size and, to be honest, I really didn’t want to tackle it either. I don’t have any love for our kitchen cabinets or even the layout, and our budget didn’t allow for an entirely new kitchen. So my plan was to leave the kitchen flooring intact until we could afford to redo the entire room.
I was almost ready to leave the tile flooring in the dining room and garage entry too, because I didn’t see any other possibility. It was connected to the kitchen tile, and how could we only tear up a portion of it? Easy, the designers at Union Furniture & Flooring assured me. And what’s more, they convinced me that we could do the demo ourselves as a way to save some money. Luckily, there was a grout line right where I wanted to create the line of demarcation between the kitchen and the dining room. We (my husband) had to be careful when ripping up the tile close to the line, but it worked. He used a hammer and a 3-pound sledge — he hit the sledge on the hammer to break up the tile and the claw of the hammer to pry it loose. Later, he went back with a long-handled 6-inch flooring scrapper that he bought specifically to remove any leftover grout and get the subfloor as level as possible. All of it was excruciating work (at least, it looked like it from my vantage point of doing nothing), but successful! We were able to create a clean line for the tile to end and the hardwood to begin.
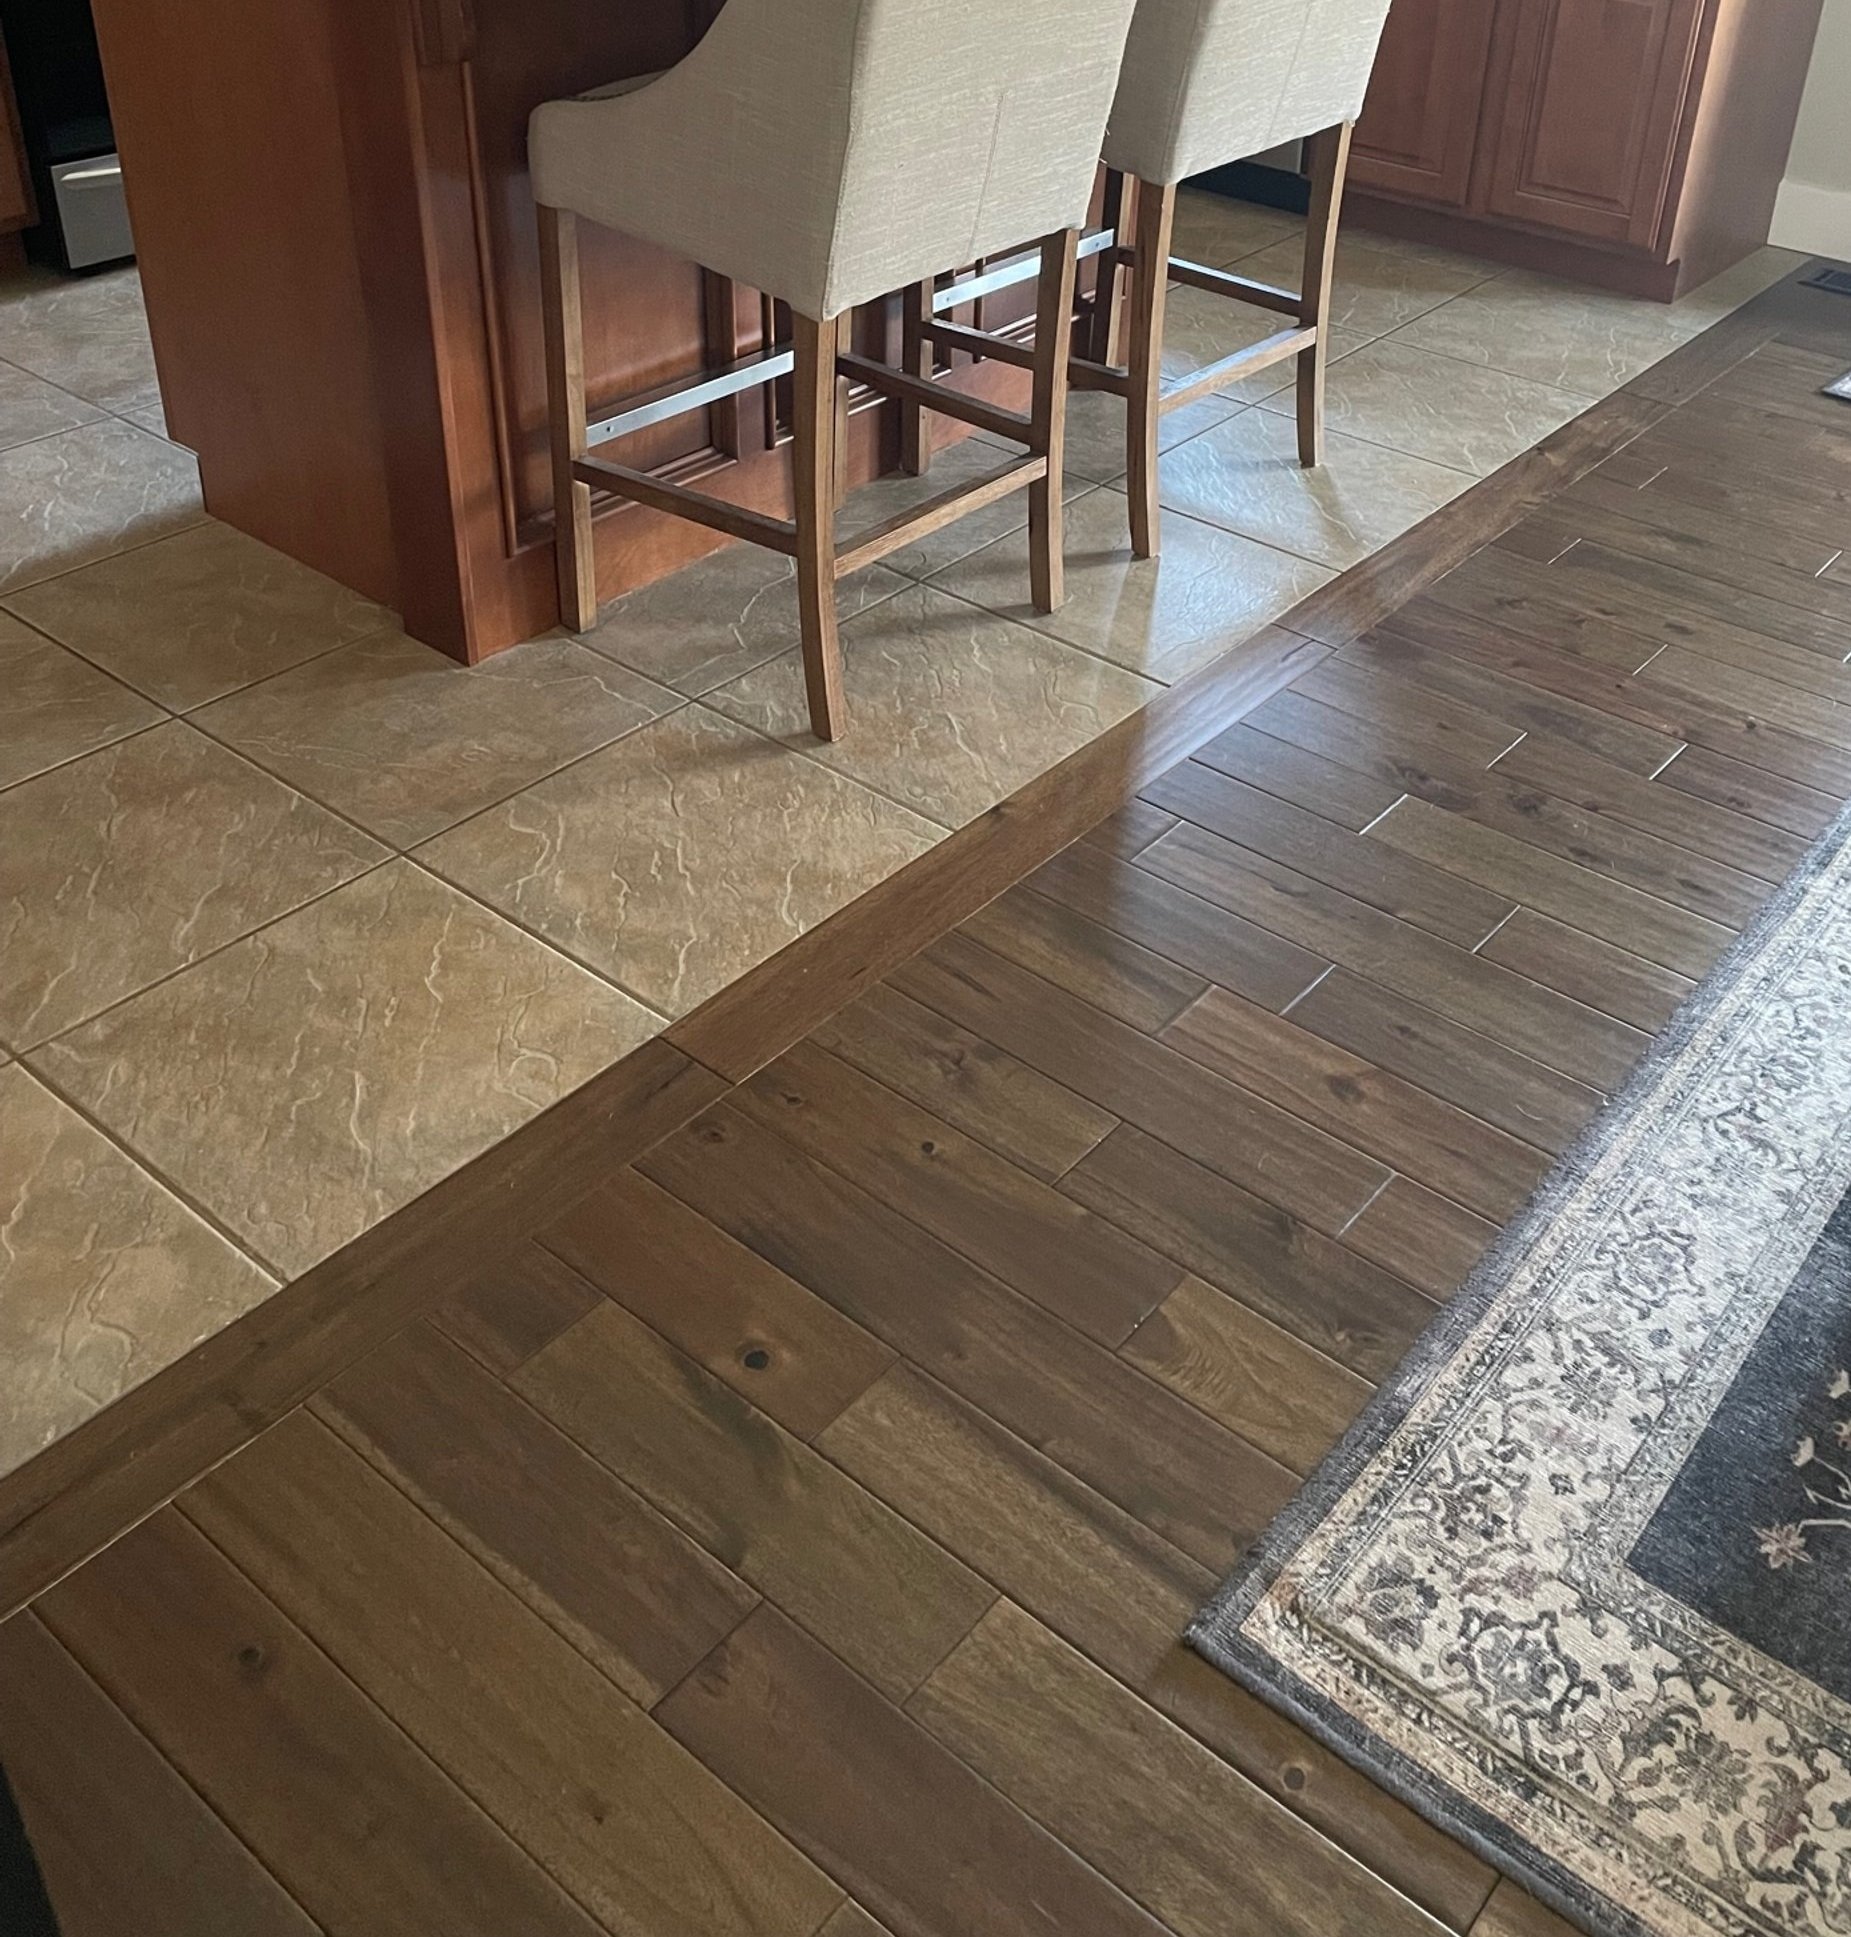
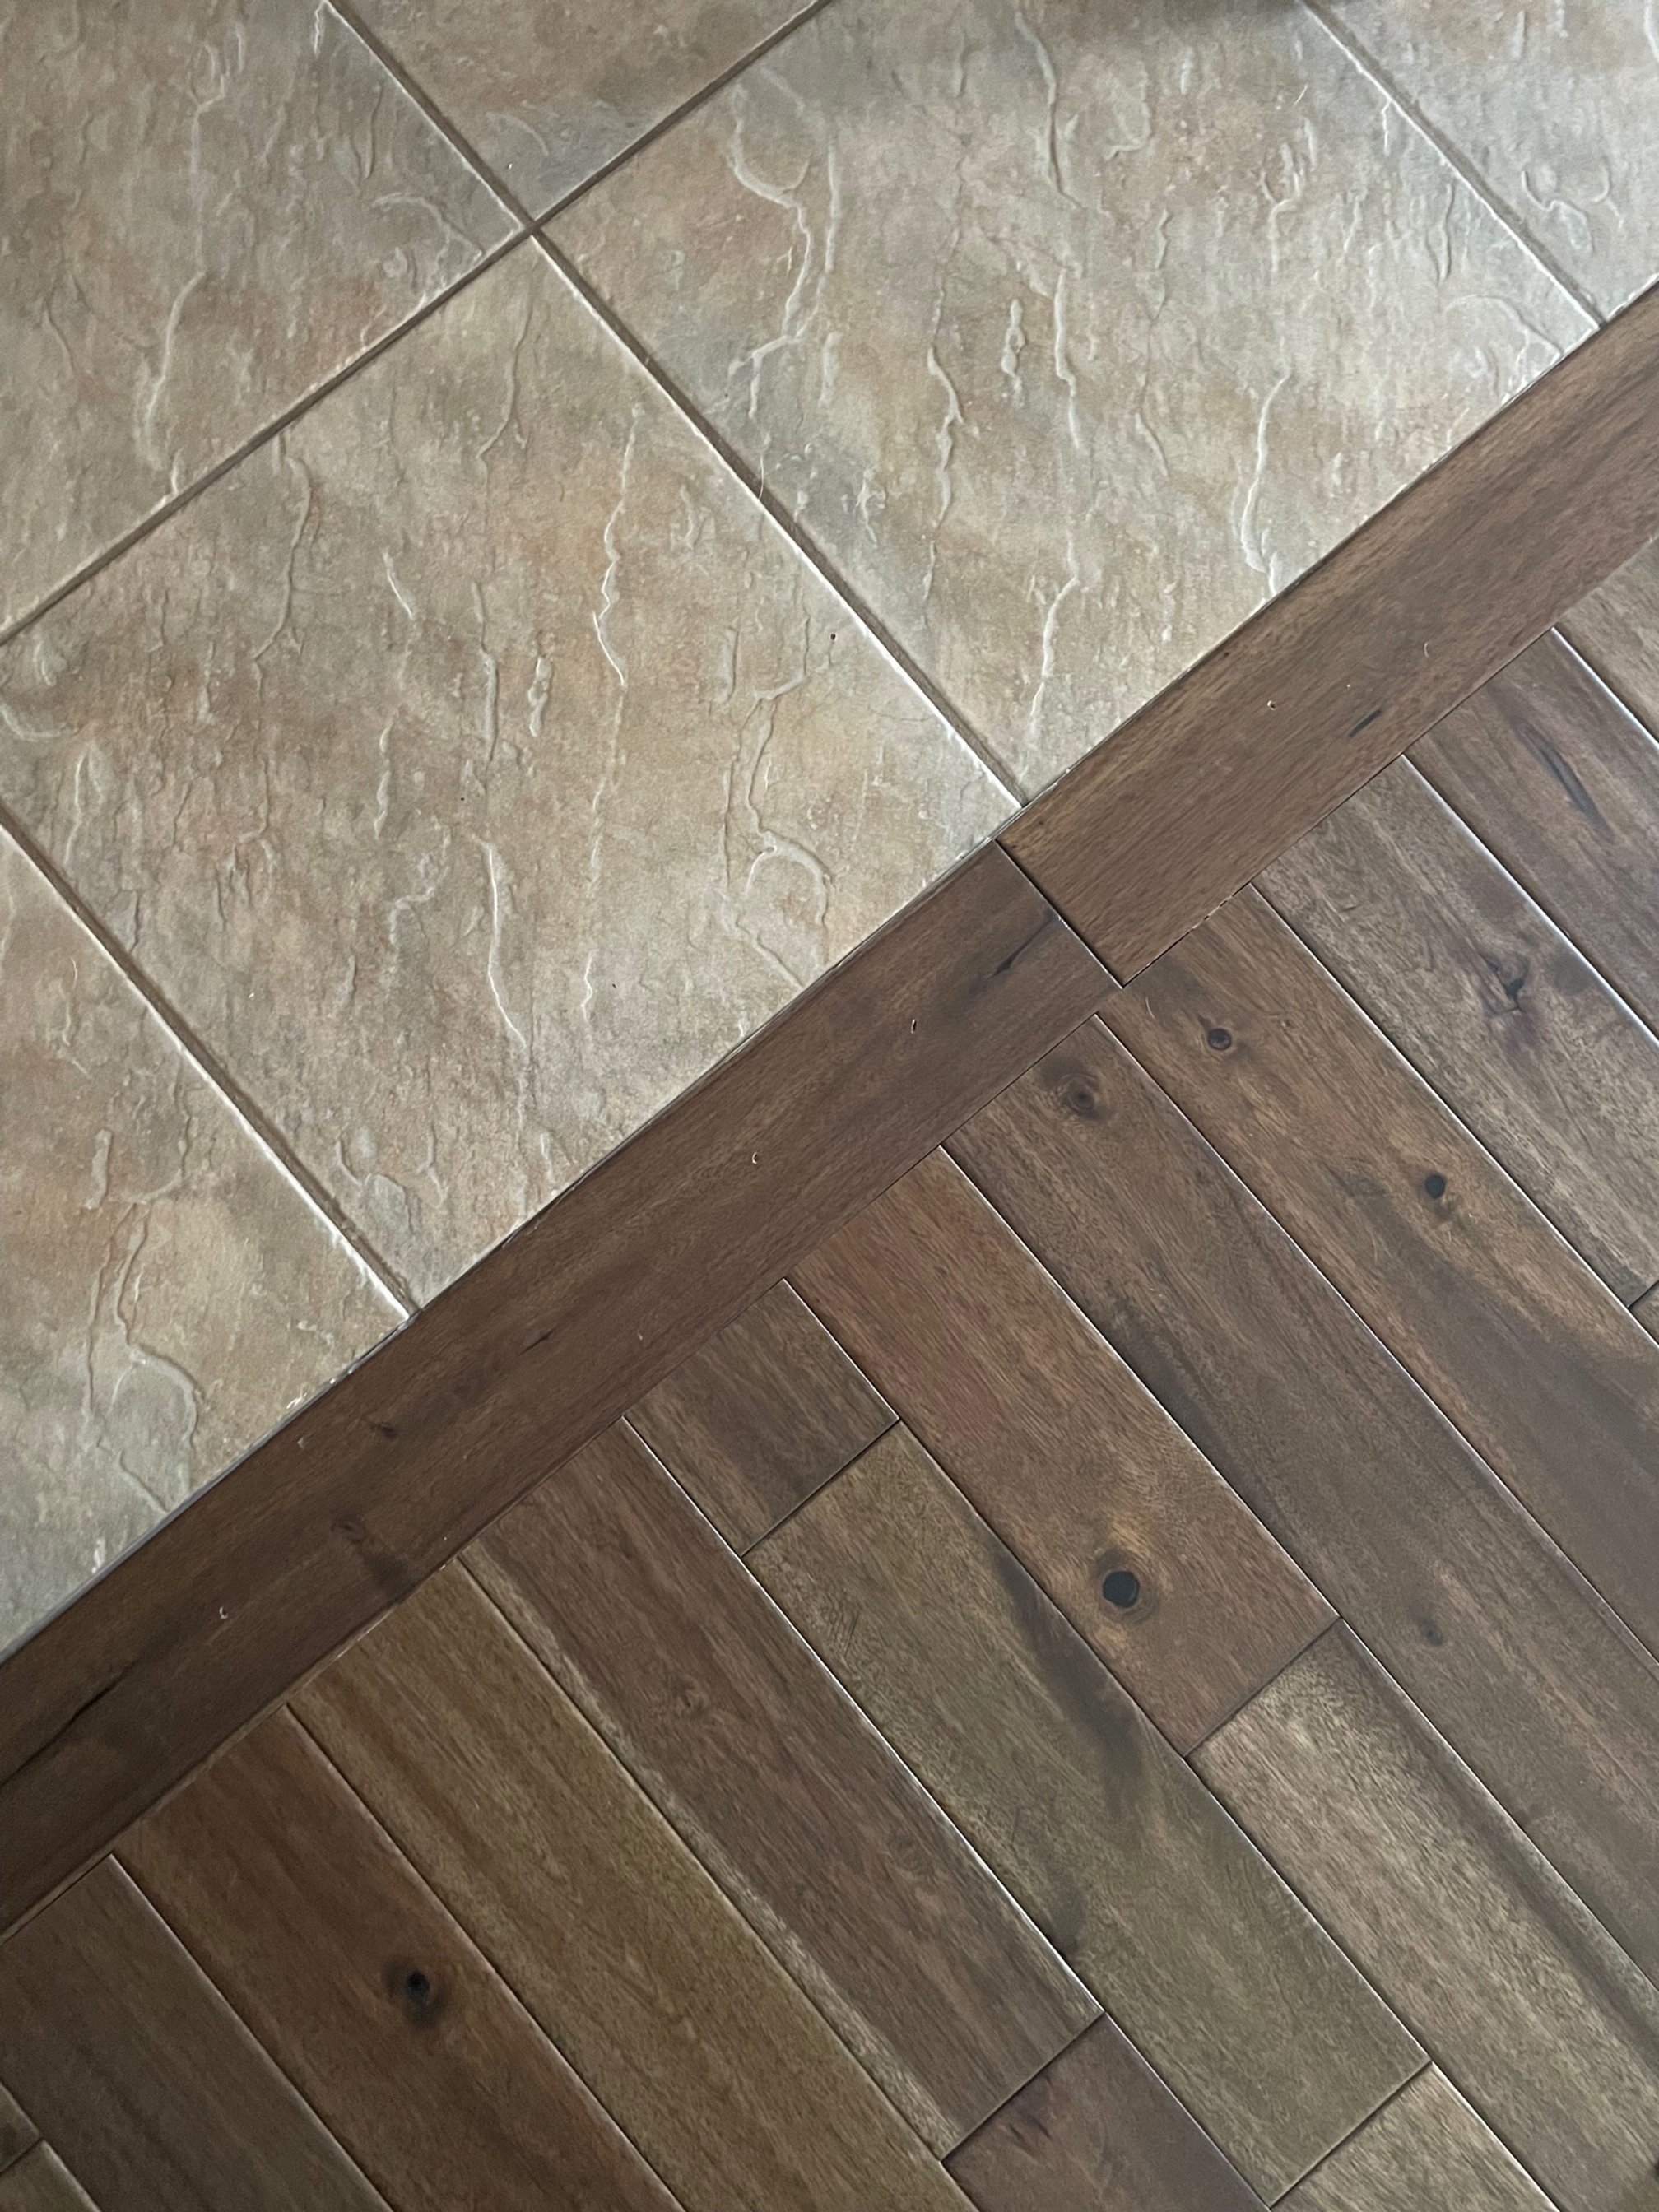
Selecting a hardwood was kind of stressful for me, because I’m terribly indecisive by nature. But the design team at Union Furniture & Flooring (we worked with Dani, Gail and Angela) made it easy by asking a few questions about our space and how we live. Because our house is open concept, the color of our kitchen cabinets was a factor, and so was the fact that we were leaving the tile in the kitchen where the hardwood would meet. The thickness of the wood needed to be equivalent to the installed tile, the designers explained, or else there would not be a level transition between the two floorings. We didn’t want flooring that was too light or too dark. The goal was traditional — nothing too trendy. Angela, Gail and Dani made a few suggestions and sent me home with sample boards. It took me a few tries before settling on one (Arlington by Casabella), and truth be told, my final decision was influenced mostly by availability and estimated time of delivery (thanks, COVID!). Once the flooring arrived, scheduling the installation was smooth, and the installer was skilled and efficient. He had the job done in just a couple of days, and we are very pleased with the end result.

Going from carpet in the living room to hardwood had me concerned about the warmth of the space, especially in winter, but the reality is that the wood is not as cool underfoot as I expected. It’s not as warm as carpet, of course, but it’s definitely warmer than tile. We did add an area rug to the living room to add more warmth and comfort, and also just to protect the hardwood. I thought a 10- by 10-foot rug would fit the space best (enough to go halfway under the sofa and the side chairs, but not too wide that it bumped into the walkway), and since that’s an unusual rug size, we decided to have a piece of carpeting cut to size and the edges bound. Dani suggested a low shag style by Shaw because it would be nice and cushy on our feet, and wow! was she right! Sometimes I just rub my bare feet and curl my toes against the rug because it is so silky soft.
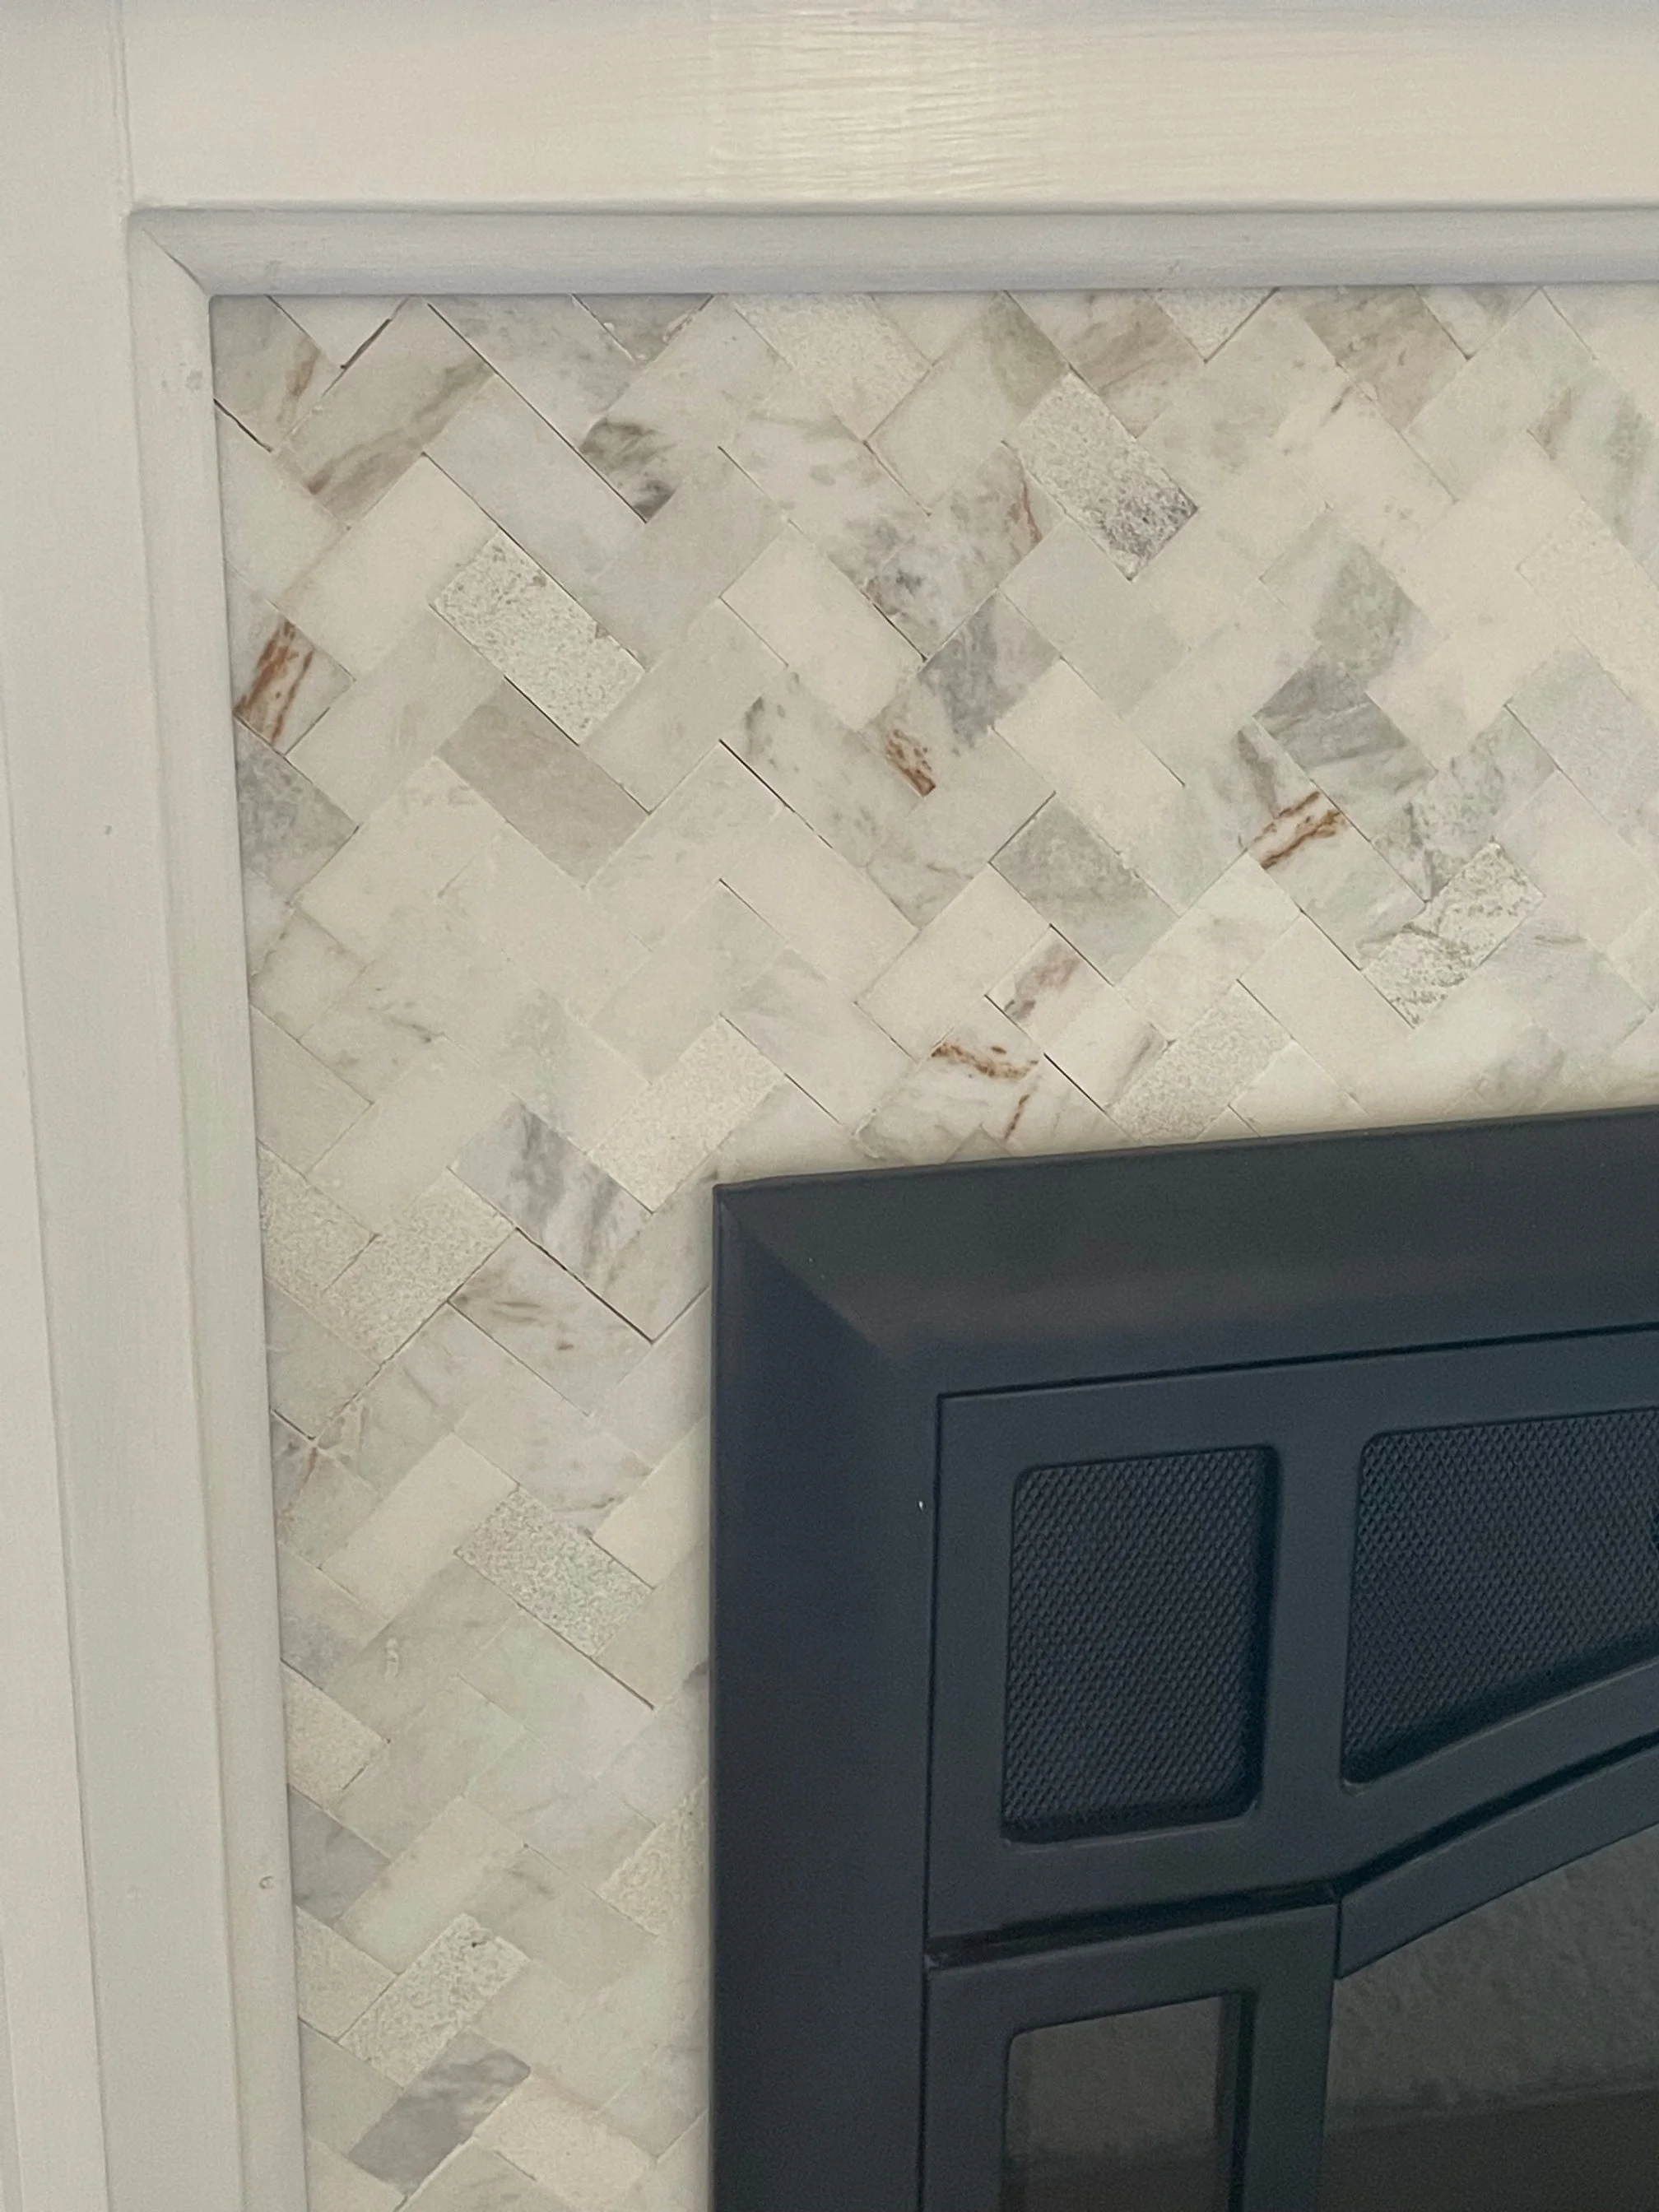
Of course, having new hardwood installed naturally led us to want to replace all of our baseboards from the builder-grade particle board to real wood and also to replace the tile on the faux fireplace surround to something more interesting. The builder, no doubt for simplicity’s sake, had used the same tile that was on the floor in the kitchen, dining room and entry ways for the fireplace surround, and it made me cringe. It was the first thing I removed when we started the demo process. I wanted a tile with more of a design element, so I spent time searching for inspiration on Houzz and Pinterest and thought I knew what I wanted — a glossy tile, probably a shade of white or possibly a subtle color, like moss green, done in a herringbone pattern. But as I searched the samples in the Design Center at Union Furniture & Flooring and talked with Angela and Gail about the small size of the area that needed to be covered (only 5 inches on either side of the fireplace and 10 inches at the top), they explained that the larger tiles I had been considering wouldn’t work to give me the herringbone design I wanted. There just wasn’t enough space. I needed a smaller-scale tile, Gail said, and then she pulled out the perfect option — Daphne White Marble in a herringbone pattern by Daltile. The individual tiles are 1 by 3 inches in size and the white color is accented with grey and brown tone veins that pick up the color of our new hardwood floor. I think angels starting singing when she laid the tile sample next to our hardwood sample. Delivery only took a couple of weeks, and the installation was finished within just a few hours. And just like the floor, the end result is so pleasing that I sometimes find myself staring at the tile just to admire it.

It will probably surprise no one that all of this newness led me also to replace the curtain panels we had in the living and dining rooms, to buy a new round mirror for the entry way, to add hardware to the kitchen cabinets in order to pick up on the color of the new wood floor in the adjacent dining room, and to have our side chairs reupholstered to better coordinate with the space. Eventually we will do more (replace the carpeting in the bedrooms, the tile in the master and guest baths and, of course, completely redesign the kitchen), and when we do, you can bet I’ll be talking to Dani, Gail and Angela for help with all of it!